Appearance
Payload mapping for devices
Payload mapping tells the Firmcraft IoT Dashboard where each reading sits in your device's message. You set it in step 5 of the Add Device wizard, and you can change it later from the device's Edit form.
This page is for a single device. For a gateway that reports for several devices, see Payload mapping for gateways.
Who can do this: Admin User
Do you need it?
No mapping is needed if your device puts its readings in one of these places:
| Your message | Readings stored |
|---|---|
{ "temperature": 22.4, "humidity": 55 } | temperature, humidity |
{ "telemetry": { "temperature": 22.4, "humidity": 55 } } | temperature, humidity |
{ "metrics": { "temperature": 22.4 } } | temperature |
The same works for a points object. Common short names are recognised too: temp is stored as temperature, hum as humidity, volt as voltage.
You need a mapping if your readings are nested somewhere else, sit inside a list, or need scaling. For example:
json
{
  "id": "COLDROOM-1",
  "sensors": {
    "room": { "t": 4.2, "rh": 71 },
    "door": { "open": 0 }
  },
  "battery_mv": 3610
}
Map every reading you want to keep
Once a device has at least one Device Telemetry mapping, the IoT Dashboard stores only the readings you mapped. Anything else in the message is ignored.
Set up the mapping
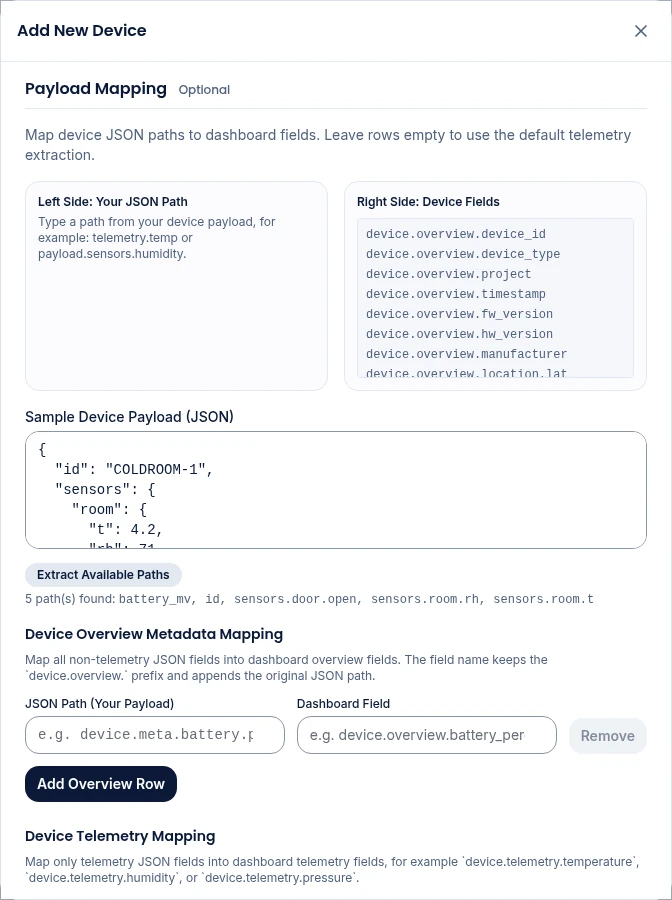
In step 5 of the Add Device wizard, Payload Mapping:
- Paste one real message from your device into Sample Device Payload (JSON).
- Click Extract Available Paths. The IoT Dashboard lists the paths it found in your sample, and suggests them as you type in the JSON Path boxes.
- Under Device Telemetry Mapping, fill in one row per reading:
- JSON Path (Your Payload): where the value is in your message, such as
sensors.room.t. - Dashboard Field:
device.telemetry.followed by the metric name, such asdevice.telemetry.temperature. Use the same metric names you added in step 3, so the readings land on the right widgets and alerts.
- JSON Path (Your Payload): where the value is in your message, such as
- Click Add Telemetry Row for each extra reading. Remove deletes a row.
- Click Test Mapping to check the result. See Test the mapping.
- Click Submit Device.
For the example message above, the rows are:
| JSON Path (Your Payload) | Dashboard Field |
|---|---|
sensors.room.t | device.telemetry.temperature |
sensors.room.rh | device.telemetry.humidity |
sensors.door.open | device.telemetry.door_open |
battery_mv | divide:1000 | device.telemetry.battery_voltage |
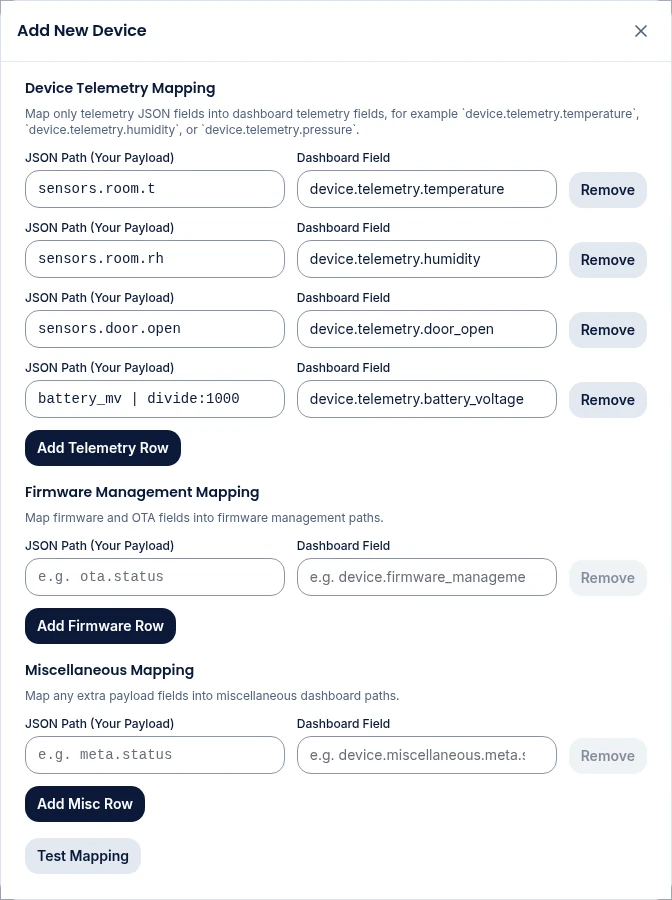
The last row turns millivolts into volts. See Transforms.
The other mapping sections
The step also has Device Overview Metadata Mapping, Firmware Management Mapping and Miscellaneous Mapping, with Add Overview Row, Add Firmware Row and Add Misc Row. These are saved with the device, but they don't create readings. Only Device Telemetry Mapping rows appear on the device page, in charts and in alerts.
Writing a JSON Path
| Your message | JSON Path |
|---|---|
{ "temp": 22.4 } | temp |
{ "data": { "temp": 22.4 } } | data.temp |
{ "sensors": [ { "temp": 22.4 }, { "temp": 23.1 } ] }, first sensor | sensors[0].temp |
{ "sensors": [ { "temp": 22.4 }, { "temp": 23.1 } ] }, second sensor | sensors[1].temp |
Paths are case-sensitive: Temp and temp are different.
Transforms
To scale, convert or relabel a value, type transform steps after the path, each after a |:
battery_mv | divide:1000
voltage_raw | multiply:0.1 | round:1
state | map:RUN=1,STOP=0
The device wizard has no Transform value panel, so you type the steps into the JSON Path box. For the full list of steps, see Value transforms: written as text.
Test the mapping
With a sample pasted and at least one row filled in, click Test Mapping. The Normalized metrics preview shows each Dashboard Field and the value it got from your sample.
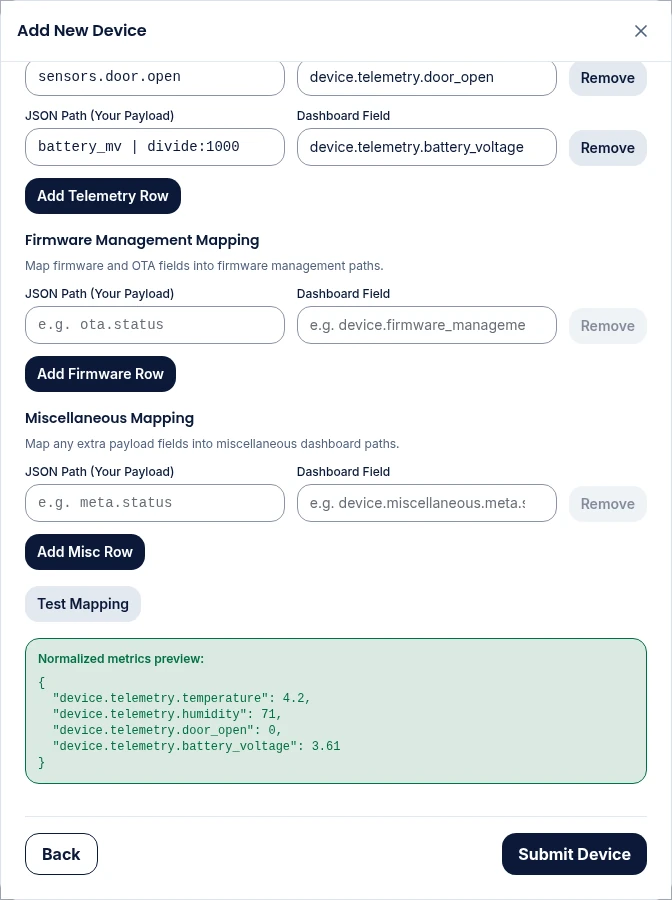
- A value of
nullmeans the JSON Path wasn't found in the sample. Check the spelling and the case. - Testing stores nothing. Your device isn't changed until you click Submit Device.
Change the mapping later
- Open Devices and click Edit on the device.
- Go to the last step. The mapping is under Device Mapping Configuration.
- Change, add or remove rows, then click Save Changes.
New messages use the new mapping. Readings already stored are not changed.
Next steps
- The device page: see the mapped readings